How to Setup my Centaur All-in-One Gateway
This article will show how to assemble, power, and activate your Centaur All-in-One Gateway — the core communication hub of the Centaur Internet-of-Crops® system — ensuring reliable connectivity between field sensors and the Centaur Cloud Platform.
1. Introduction
The Centaur wireless network is a critical part of the sensing system that monitors grain and/or fumigation conditions and environmental parameters in storage sites. It comprises three main components:
- Wireless Sensors (end nodes)
- Wireless Network Extenders (Repeaters)
- All-in-One IoT Gateway – providing both the wireless network coordination and internet connectivity
Each gateway includes a global GSM/cellular SIM card compatible with hundreds of cellular data service carriers worldwide. This allows seamless setup and operation in nearly any location.
Once installed and powered, the gateway forms the bridge between your local Centaur network and the Centaur Cloud Platform at https://cloud.centaur.ag.
2. Gateway Assembly and Setup
Follow these steps carefully to assemble and activate your All-in-One Gateway before deploying sensors or repeaters.
2.1 Unpacking and Preparation
Inside the box, you’ll find:
- The Centaur All-in-One Gateway unit
- Five antennas
- USB power cable and adapter
Inspect all components for shipping damage before beginning.
Ensure the site chosen for installation is dry, shaded, and well-ventilated, with access to a power outlet or solar power input.
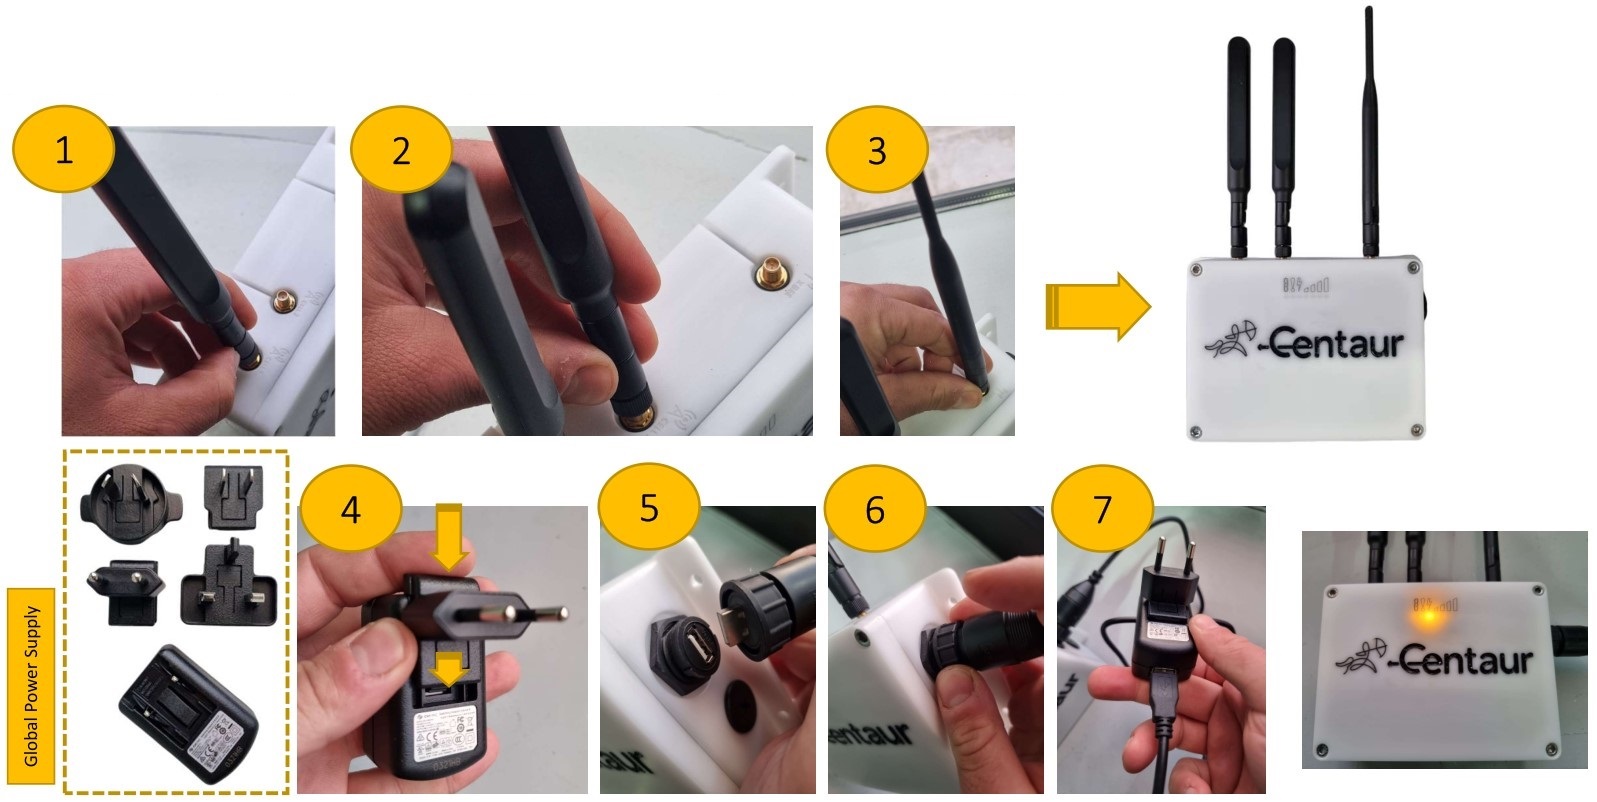
2.2 Installing the Antennas
The gateway has 3 antenna ports clearly labeled on the back panel (1) (2). Screw them in from left to right as follows:
- Xbee (local area sensor network)– long, thin antenna
- Cellular 1 – long, thick antenna
- Cellular 2 – long, thick antenna
Tighten each antenna by hand until secure — do not overtighten. Ensure all antennas are upright and unobstructed.
2.3 Powering the Device
- Plug the power adapter into a reliable power outlet (3).
- Connect the USB power cable to the gateway’s power port (4).
- Wait several seconds for LEDs to illuminate (5).
⚙️ Tip: The device automatically boots and begins network registration when powered on. Do not disconnect during this process.
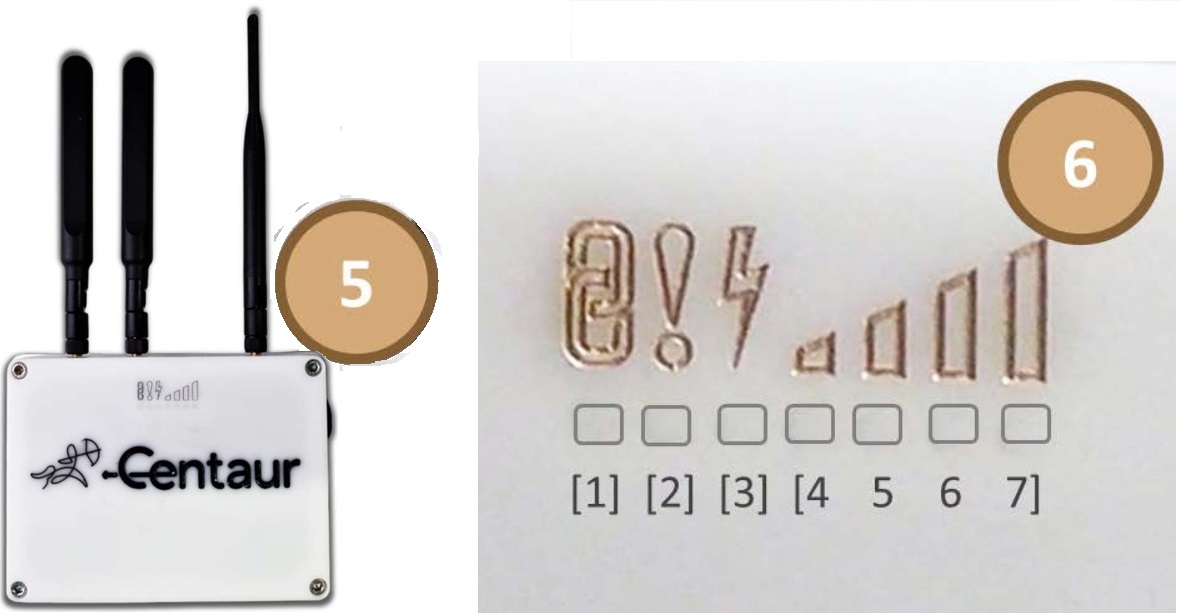
3. LED Indicators and System Status
Once the gateway is powered, observe the seven front-facing LEDs. They indicate the following statuses:
| LED | Color | Function |
|---|---|---|
| 1 | Blue | Xbee network activity |
| 2 | Red | Generic fault indicator |
| 3 | Yellow | Power ON |
| 4–7 | Green | Cellular signal strength (4 = weak, 7 = strong) |
Normal Operation: Power LED (yellow) steady ON, Xbee LED (blue) blinking, and at least two green signal LEDs lit.
If no signal LEDs appear: check SIM card seating and antenna connections, then restart the gateway.
4. Connectivity Options
By default, the Centaur Gateway connects via its built-in cellular modem.
If your site requires Ethernet or Wi-Fi connectivity, use one of these alternatives:
- Ethernet (LAN): Remove the waterproof cap to expose the LAN port. Plug in a network cable to a local router(use only the ethernet port close to the USB ports).
- Wi-Fi: Use the built-in Wi-Fi interface to join your facility’s wireless network (configuration via Centaur Support).
🔒 Note: Removing the waterproof cap voids outdoor weather sealing. Keep the gateway indoors if Ethernet is used.
5. Verifying Gateway Activation
After powering and connecting the gateway:
- Open your Centaur Cloud account at https://cloud.centaur.ag.
- Go to the Devices tab.
- Locate the gateway by its unique Centaur name and ID printed on the unit’s label.
- Confirm it displays a green flashing dot, indicating it’s online and ready to communicate with sensors.
Once the gateway appears online, you can proceed to sensor discovery and network setup.
See “How to Setup my Sensors and Repeaters” for detailed sensor activation and pairing instructions.
6. Troubleshooting Quick Reference
| Symptom | Possible Cause | Solution |
|---|---|---|
| No LEDs illuminate | Power disconnected | Verify power supply and USB cable |
| Red fault LED on | Firmware or hardware issue | Restart gateway; contact support if persistent |
| No cellular signal | Weak coverage or antenna issue | Reposition gateway; ensure antennas are fully connected |
| Gateway not visible in Cloud | Connectivity failure | Confirm cellular data availability; restart device |
7. Support
For assistance or advanced setup (e.g., Wi-Fi configuration, firmware upgrade, or integration to LAN):
📧 support@centaur.ag